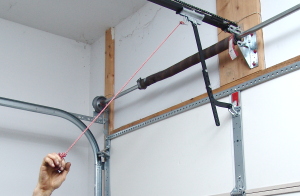
The garage door opener has a circuit that runs to the door button. When the button is not pressed, there is no current flowing through the circuit. When the button is pressed the circuit is completed and the garage door opener detects the current on the wire that normally has none. To emulate this, we need a way to briefly send current into the same wire that normally gets it when the garage door button is pressed. By connecting the COM port of the MIMOlite to the black garage door wire and the NO normally open port to the red garage door wire, the current will flow only when the relay is powered.
Before we start I want to emphasize that this is meant to be a general guide and not a comprehensive walkthrough.
Automating your garage door with MIMOlite | Object Partners
The approach I detail here worked for me, but be sure to take utmost care and familiarize yourself with local fire and electrical codes before starting on this project. We select this because we only need to close the circuit briefly to activate the garage door. Otherwise it would be like continuously holding down your garage door button. Next you can pair both the module and the door sensor with your hub. Simply powering on the module will pair it with a Z-Stick in inclusion mode. Your door sensor pairing process may vary, but mine just needed to be turned on near a Z-Stick also in inclusion mode.
After pairing, you should test the door sensor to make sure it properly reflects the states you want, and add any rules you need based on the garage door state e.
Installing a Garage Door
I also did not end up attaching a sensor to the module, as I opted to monitor the garage door state independently of it. Anyway, go ahead and cut enough wire for each terminal you will be using. Double that number if you are also attaching a sensor. Strip enough of the wire covering on each side to connect to the terminals and other wires. Connect one of the wires to the COM terminal in the relay block, and connect the other to the NO terminal. Be sure to strip the splicing wires as well. At this point you should have 2 or 4 wires coming out of your module, and an additional 2 or 4 wires for splicing in, so we are ready to hook up our new device.
Next, use the wire connectors to attach the MIMOlite COM wire to the wire that was connected to the black terminal of the garage door opener, and then attach both to a new wire that connects to the black terminal on the opener. Begin removing the door panels. Start at the top panel, and remove the hinges connected to the panel below Image 1. Be careful when dealing with glass. Disconnect the track by unscrewing or unbolting it from the doorframe.
If you're planning to replace your automatic door opener, remove the opener's track from above Image 2. After the tension has been released, disconnect the existing garage-door opener from the door.
- !
- olympic village hook up rumors?
- !
- how to create a dating site username?
- plus dating sites?
- !
- !
If you're planning to replace your automatic door opener, remove the opener's track from above Image 2 and remove the opener Image 3. If you're installing a two-car garage door, place a reinforcing bar on the top panel to prevent the door from bowing in the center. Be sure the bar is centered on the panel. Drill pilot holes Image 1 , and secure the bar with screws. Attach hinges to the top of each panel Image 2. Many new doors come with pilot holes drilled by the manufacturer.
Place the bottom panel into the door opening. Hold the panel upright by driving a nail into the wall next to the panel and bending it over to hold the panel in place Image 3.
Install It
Make sure it's level before attaching the next panel. Begin installing your new door. Attach axle supports to the bottom of the bottom panel and to the top of the top panel.
Attach the next panel on top of the first one. Make sure the groove of the upper panel rests on the ridge of the lower panel. Repeat the process until all the panels are in place. The final panel should extend 1" or so past the top of the door opening. From inside the garage, secure the top half of each hinge to the panel above Image 1. Place the wheeled axles into the side hinges and the top and bottom axle supports.
After attaching the brackets, place them against the wall, and make sure the wheels lie properly in the track Image 2. Attach the door cable to the hook on the bottom panel axle support before attaching the bottom bracket to the wall Image 3. Begin installing the track by attaching brackets to the vertical track pieces. Check your instruction manual to be sure you're installing the brackets in the correct places.
How to re hook up garage door
Assemble the pieces to support the spring assembly, and attach them to the track Image 1. Check the instruction manual to make sure you're installing the assembly in the correct place. Rest the curved portion of the track on the vertical piece you installed earlier Image 2 , and attach the other end to the ceiling bracket. Rest the curved portion of the track on the vertical piece, and attach the other end to the ceiling bracket Image 3.
Use the same ceiling supports that were used with the old door. Rest the curved portion of the track on the vertical piece you installed earlier Image 2 , and attach the other end to the ceiling bracket Image 3. Drill a hole through the horizontal track to line up with the vertical track.
Use the holes in the vertical track to determine where to drill the hole, then bolt the tracks together. Attach the horizontal track to the vertical track on the door. Don't tighten the bolts firmly until you're sure the door fits properly and lines up smoothly. Use the holes in the vertical track to determine where to drill the hole. Bolt the tracks together. Be sure to use the correct size bolt: Locate the center of the opening, and mark it on the door header.
You will attach the support for the spring there later. Attach the spring anchors to the springs Image 1 , then attach the spring locking cone. The locking cone must be on securely: Bolt the two springs securely to the main header bracket Image 2. Slide the torsion rod into the holes in the side header brackets Image 1. Make sure the rod is secure, then attach the pulleys to each end of the rod. Secure the center header bracket to the center mark on the header Image 2. Remove all ropes or cords attached to the garage door so you won't get tangled in them during installation.
Deactivate or remove all existing garage door locks, so they won't accidentally engage and either damage the opener or cause personal injury. Make sure there is an electrical plug in the immediate area of the opener motor. They are usually mounted in the ceiling, facing down. You will need to install one, or have one installed by a licensed electrician, if you do not have one already. If you need to install permanent electrical wiring, always disconnect the power at the main breaker box before attempting to wire connections.
- pagan dating usa?
- !
- Automating your garage door with MIMOlite.
Always connect the power cord of the garage door opener to a properly grounded outlet to avoid electrical shock. Lay out all of the parts your opener came with. Make sure that the parts list included with your opener matches the parts included in the package.
Begin by putting together the main assembly. Your opener should have come with a list of detailed installation instructions, so follow those to begin assembly. First put the rail together. This should come in several pieces that fit easily together. Then you will need to slide the carriage also known as a trolley over the rail. This is the piece of the opener that will move along the rail, pulling the door open. Attach the rail to the motor compartment.
This is the largest piece of the opener and it will be positioned furthest from the garage door.